
Most AWS tutorials assume an enterprise budget. They’ll casually suggest an RDS instance (€30+/month), an ALB (€22+/month), and ECS Fargate (per-second billing that adds up fast) like that’s a normal starting point.
It’s not. If you’re coming from a homelab background, you want to know what’s actually useful in AWS for the price of two coffees a month.
This guide builds a practical AWS setup that costs under €10/month. Not a toy demo, a genuinely useful stack that gives you a public-facing Docker host, proper DNS, monitoring, and offsite backups. Think of it as the cloud equivalent of your first homelab mini PC: small, but capable enough to be the foundation for everything that comes after.
What you’re building
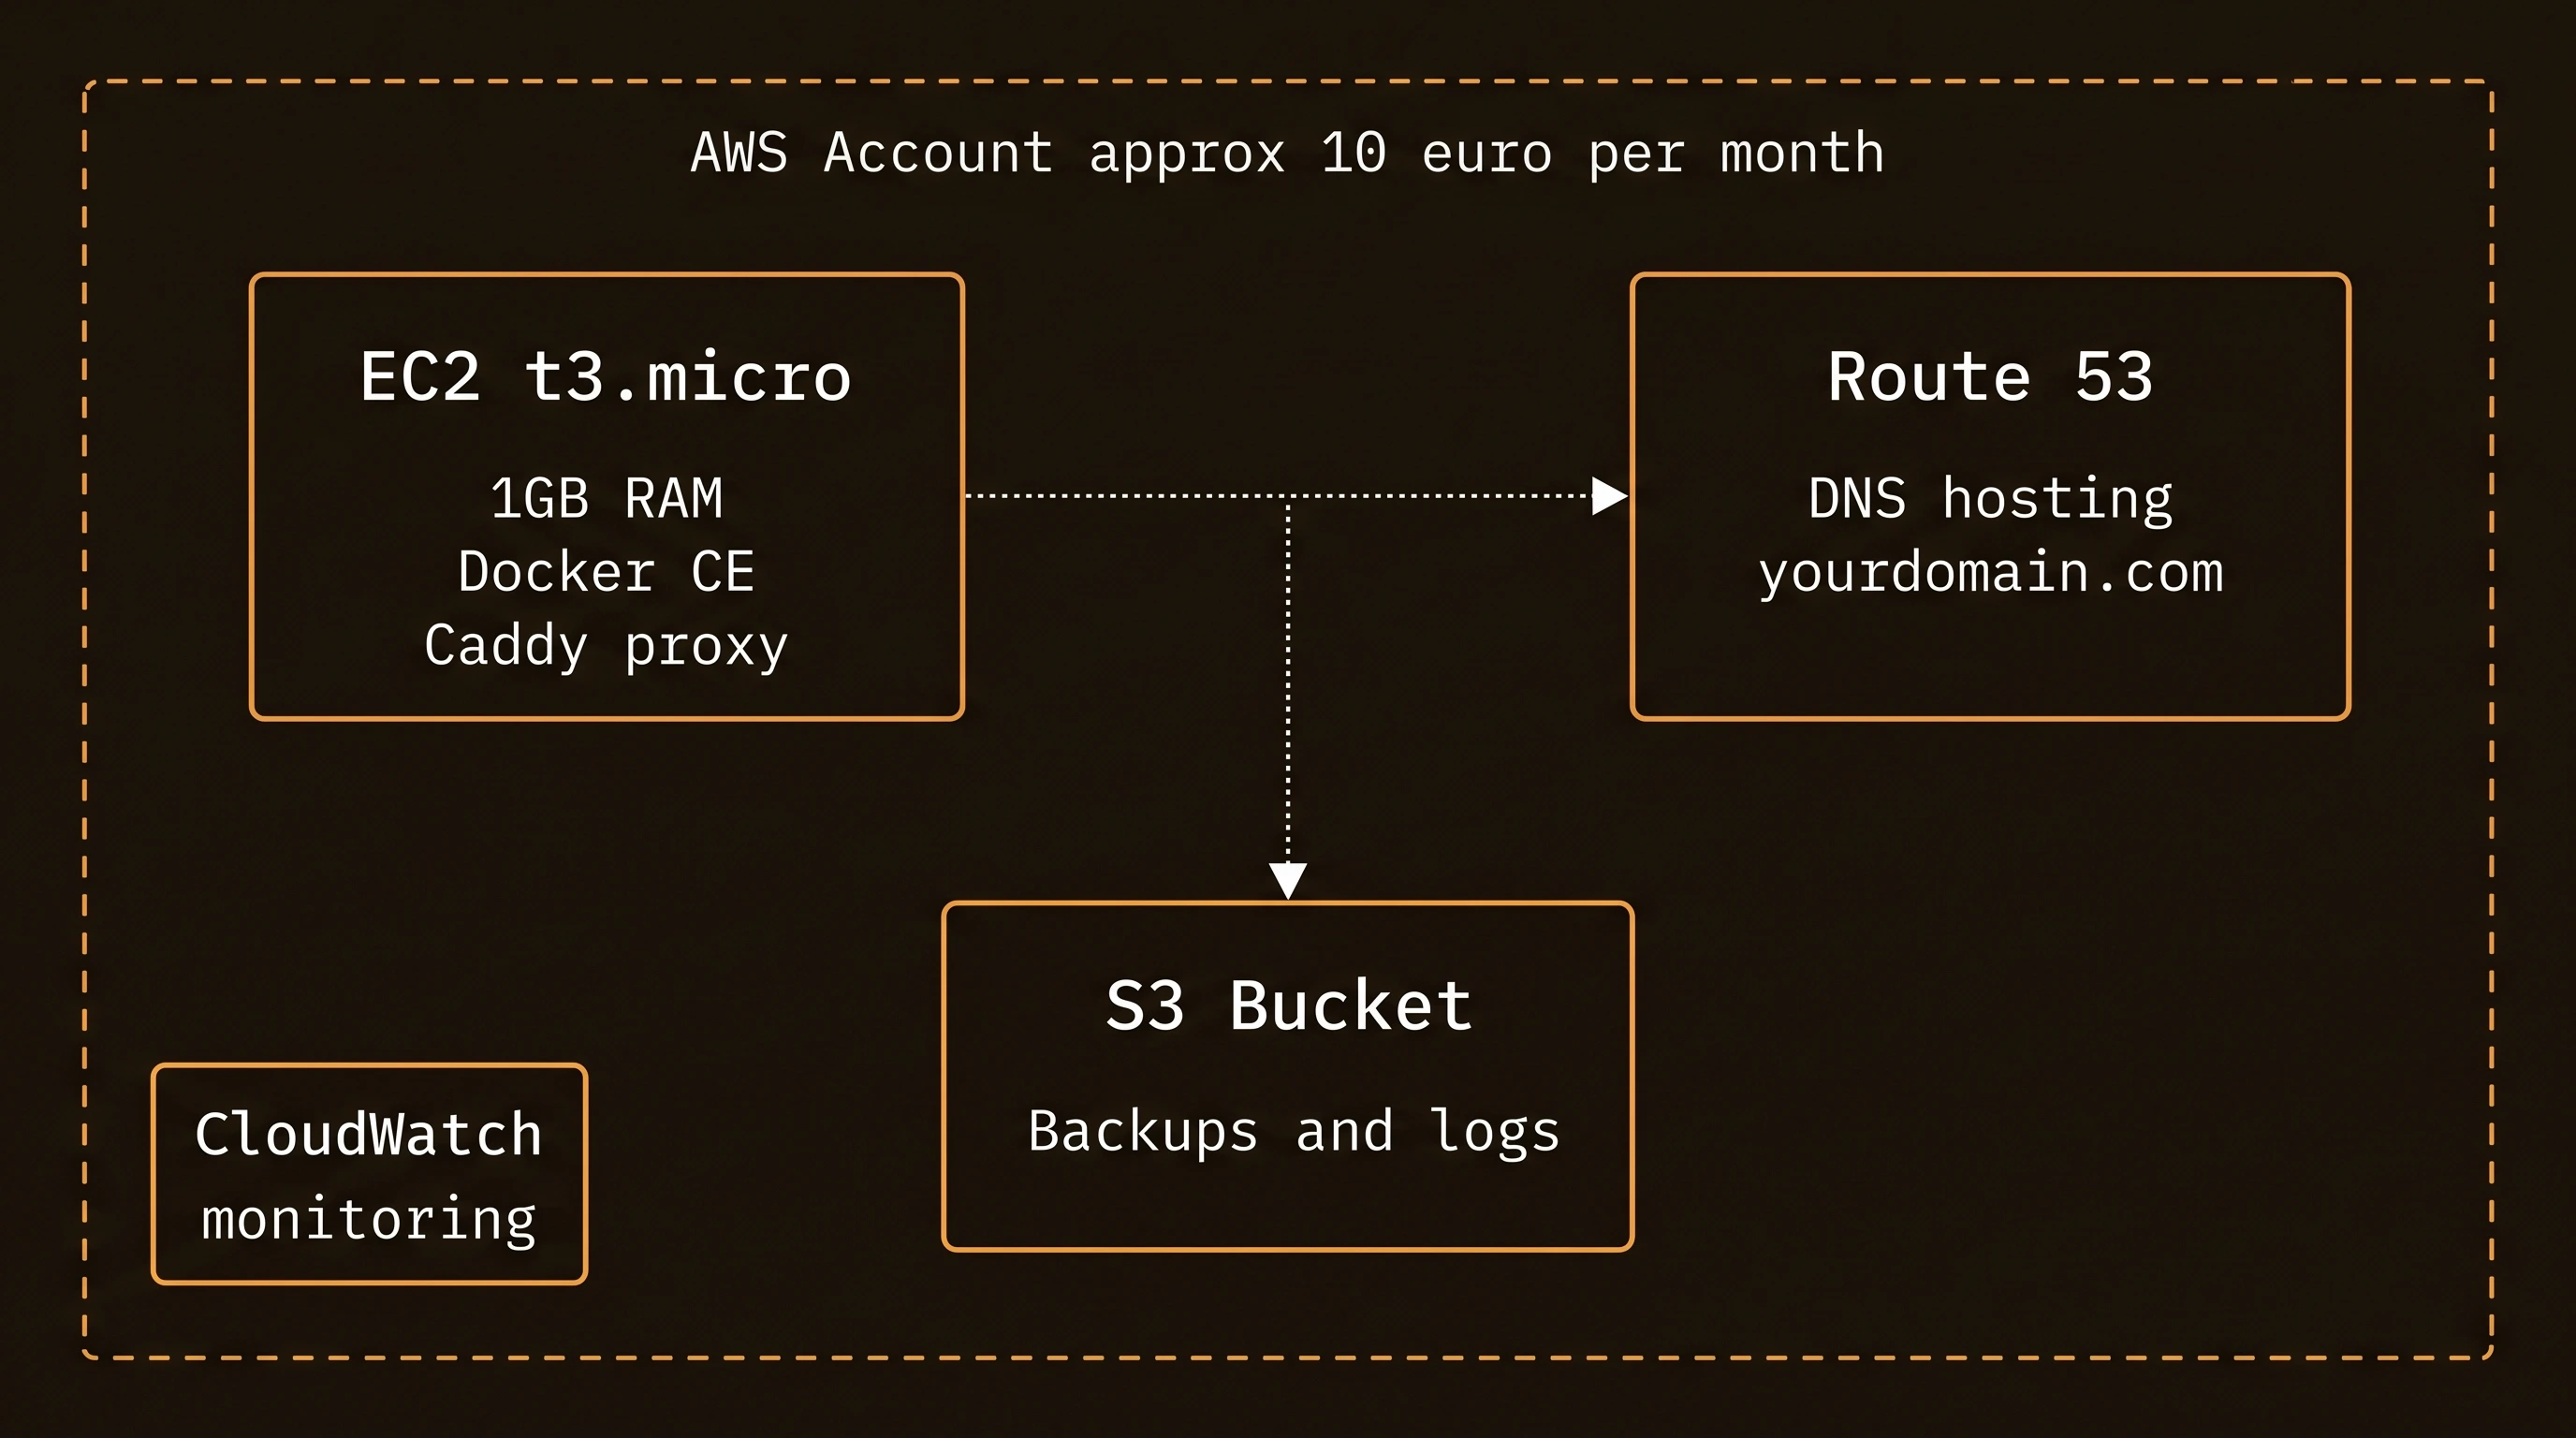
Components:
- EC2 t3.micro (or t4g.micro): 2 vCPU, 1GB RAM, a small gp3 disk. Runs Docker with Caddy as a reverse proxy.
- Route 53: DNS hosting for your domain. Optional but worth the €0.50/month for proper DNS management.
- S3: Offsite backups of the EC2 instance config and logs.
- CloudWatch: Free-tier metrics and a single alarm for CPU/disk.
The S3 bucket here only holds this instance’s own config and logs. To point the rest of the homelab at it, Proxmox VMs, Docker volumes, Nextcloud, automated S3 and Glacier backups with restic covers the scheduling and the real monthly cost.
The cost breakdown
AWS lists prices in US dollars. On-demand list prices in Frankfurt (eu-central-1) at the time of writing:
| Item | Monthly cost | Notes |
|---|---|---|
| EC2 t3.micro | ~$8.76 | $0.012/hr × 730 h |
| or EC2 t4g.micro (ARM) | ~$7.01 | $0.0096/hr; same size, cheaper |
| EBS gp3 volume | ~$0.10 per GB | 30 GB ≈ $3; 10–15 GB is enough for a small Docker host |
| Public IPv4 address | ~$3.65 | $0.005/hr for every public IPv4 since February 2024 |
| Route 53 hosted zone | $0.50 | per domain, plus small query charges |
| S3 (a few GB of backups) | cents | depends on storage class |
| Data transfer out | free up to 100 GB/month | across AWS, then charged per GB |
| CloudWatch basic metrics | free | detailed metrics and alarms beyond the free allowance cost extra |
On-demand with a t3.micro, 30 GB and a public IPv4 address that’s about $16/month. To get near €10:
- use t4g.micro (ARM: Docker images need arm64 builds, which most popular images have),
- keep the root volume small (10–15 GB),
- skip the public IPv4 address: use IPv6, or reach the instance through a Cloudflare Tunnel or Tailscale,
- or commit with a Savings Plan if you’ll run it for a year or more.
Free tier: accounts created before 15 July 2025 keep the old 12-month free tier (750 hours/month of t2/t3.micro). Newer accounts get a credit-based Free Plan (up to $200 in credits for 6 months) instead. Check which one your account has in the Billing console.
Step 1: Launch the EC2 instance
Create a key pair
aws ec2 create-key-pair \
  --key-name homelab-cloud \
  --key-type ed25519 \
  --query 'KeyMaterial' \
  --output text > ~/.ssh/homelab-cloud.pem

chmod 600 ~/.ssh/homelab-cloud.pem
Create a security group
Open only what you need, SSH, HTTP, and HTTPS:
# Get the default VPC ID
VPC_ID=$(aws ec2 describe-vpcs \
  --filters "Name=isDefault,Values=true" \
  --query 'Vpcs[0].VpcId' --output text)

# Create security group
SG_ID=$(aws ec2 create-security-group \
  --group-name homelab-cloud-sg \
  --description "Homelab cloud server" \
  --vpc-id "$VPC_ID" \
  --query 'GroupId' --output text)

# SSH (restrict to your IP in production!)
aws ec2 authorize-security-group-ingress \
  --group-id "$SG_ID" \
  --protocol tcp --port 22 \
  --cidr "0.0.0.0/0"

# HTTP and HTTPS
aws ec2 authorize-security-group-ingress \
  --group-id "$SG_ID" \
  --protocol tcp --port 80 \
  --cidr "0.0.0.0/0"

aws ec2 authorize-security-group-ingress \
  --group-id "$SG_ID" \
  --protocol tcp --port 443 \
  --cidr "0.0.0.0/0"
Security note: The SSH rule above allows access from any IP. For production use, replace
0.0.0.0/0with your home IP (curl -4 ifconfig.me/32) or, better yet, use Tailscale to access SSH without exposing port 22 at all.
Launch the instance
Using Ubuntu 24.04 LTS with a user data script that installs Docker and applies basic hardening:
cat > /tmp/userdata.sh << 'USERDATA'
#!/bin/bash
set -euo pipefail

# System updates
apt-get update && apt-get upgrade -y

# Install Docker CE
curl -fsSL https://get.docker.com | sh

# Enable and start Docker
systemctl enable --now docker

# Install useful tools
apt-get install -y \
  curl wget jq unzip \
  fail2ban \
  unattended-upgrades

# Configure automatic security updates
cat > /etc/apt/apt.conf.d/50unattended-upgrades << 'EOF'
Unattended-Upgrade::Allowed-Origins {
    "${distro_id}:${distro_codename}-security";
};
Unattended-Upgrade::Automatic-Reboot "true";
Unattended-Upgrade::Automatic-Reboot-Time "04:00";
EOF

# Basic SSH hardening
sed -i 's/#PasswordAuthentication yes/PasswordAuthentication no/' /etc/ssh/sshd_config
sed -i 's/#PermitRootLogin prohibit-password/PermitRootLogin no/' /etc/ssh/sshd_config
systemctl restart sshd

# Enable fail2ban
systemctl enable --now fail2ban

# Configure swap (t3.micro only has 1GB RAM)
fallocate -l 1G /swapfile
chmod 600 /swapfile
mkswap /swapfile
swapon /swapfile
echo '/swapfile none swap sw 0 0' >> /etc/fstab

echo "Setup complete" > /var/log/userdata-complete.log
USERDATA

# Find the latest Ubuntu 24.04 AMI
AMI_ID=$(aws ec2 describe-images \
  --owners 099720109477 \
  --filters \
    "Name=name,Values=ubuntu/images/hvm-ssd-gp3/ubuntu-noble-24.04-amd64-server-*" \
    "Name=state,Values=available" \
  --query 'sort_by(Images, &CreationDate)[-1].ImageId' \
  --output text)

# Launch
INSTANCE_ID=$(aws ec2 run-instances \
  --image-id "$AMI_ID" \
  --instance-type t3.micro \
  --key-name homelab-cloud \
  --security-group-ids "$SG_ID" \
  --block-device-mappings '[{"DeviceName":"/dev/sda1","Ebs":{"VolumeSize":30,"VolumeType":"gp3"}}]' \
  --user-data file:///tmp/userdata.sh \
  --tag-specifications 'ResourceType=instance,Tags=[{Key=Name,Value=homelab-cloud}]' \
  --query 'Instances[0].InstanceId' \
  --output text)

echo "Instance launched: $INSTANCE_ID"

# Wait for it to be running
aws ec2 wait instance-running --instance-ids "$INSTANCE_ID"

# Get the public IP
PUBLIC_IP=$(aws ec2 describe-instances \
  --instance-ids "$INSTANCE_ID" \
  --query 'Reservations[0].Instances[0].PublicIpAddress' \
  --output text)

echo "Public IP: $PUBLIC_IP"
Allocate an Elastic IP (optional but recommended)
Without an Elastic IP, your public IP changes every time you stop/start the instance. An Elastic IP is free while attached to a running instance:
ALLOC_ID=$(aws ec2 allocate-address \
  --query 'AllocationId' --output text)

aws ec2 associate-address \
  --instance-id "$INSTANCE_ID" \
  --allocation-id "$ALLOC_ID"

ELASTIC_IP=$(aws ec2 describe-addresses \
  --allocation-ids "$ALLOC_ID" \
  --query 'Addresses[0].PublicIp' --output text)

echo "Elastic IP: $ELASTIC_IP"
Cost warning: Every public IPv4 address costs $0.005/hour (~$3.65/month) since February 2024, attached or not. Release Elastic IPs you no longer use.
Step 2: Set up DNS with Route 53
If you’re managing DNS through a domain registrar’s panel, Route 53 is a meaningful upgrade: it’s fast, scriptable, and integrates with everything in AWS.
# Create a hosted zone
ZONE_ID=$(aws route53 create-hosted-zone \
  --name yourdomain.com \
  --caller-reference "$(date +%s)" \
  --query 'HostedZone.Id' --output text | sed 's|/hostedzone/||')

# Point your domain to the EC2 instance
aws route53 change-resource-record-sets \
  --hosted-zone-id "$ZONE_ID" \
  --change-batch '{
    "Changes": [{
      "Action": "UPSERT",
      "ResourceRecordSet": {
        "Name": "cloud.yourdomain.com",
        "Type": "A",
        "TTL": 300,
        "ResourceRecords": [{"Value": "'$ELASTIC_IP'"}]
      }
    }]
  }'

# Wildcard for subdomains (useful for Caddy routing)
aws route53 change-resource-record-sets \
  --hosted-zone-id "$ZONE_ID" \
  --change-batch '{
    "Changes": [{
      "Action": "UPSERT",
      "ResourceRecordSet": {
        "Name": "*.cloud.yourdomain.com",
        "Type": "A",
        "TTL": 300,
        "ResourceRecords": [{"Value": "'$ELASTIC_IP'"}]
      }
    }]
  }'
After creating the hosted zone, update your domain registrar’s nameservers to the four NS records Route 53 assigned. This can take up to 48 hours to propagate, though it’s usually under an hour.
Step 3: Deploy Caddy + your first services
SSH into the instance and set up a Docker Compose stack with Caddy as the reverse proxy. Caddy handles HTTPS certificates automatically via Let’s Encrypt, no configuration needed:
ssh -i ~/.ssh/homelab-cloud.pem ubuntu@$ELASTIC_IPCreate the project structure:
mkdir -p /opt/stack && cd /opt/stack

cat > docker-compose.yml << 'EOF'
services:
  caddy:
    image: caddy:2-alpine
    restart: unless-stopped
    ports:
      - "80:80"
      - "443:443"
      - "443:443/udp"  # HTTP/3
    volumes:
      - ./Caddyfile:/etc/caddy/Caddyfile
      - caddy_data:/data
      - caddy_config:/config

  whoami:
    image: traefik/whoami
    restart: unless-stopped
    expose:
      - "80"

  uptime-kuma:
    image: louislam/uptime-kuma:1
    restart: unless-stopped
    volumes:
      - uptime_data:/app/data
    expose:
      - "3001"

volumes:
  caddy_data:
  caddy_config:
  uptime_data:
EOF
The Caddyfile:
cat > Caddyfile << 'EOF'
cloud.yourdomain.com {
    respond "homelab cloud node is running" 200
}

status.cloud.yourdomain.com {
    reverse_proxy uptime-kuma:3001
}

whoami.cloud.yourdomain.com {
    reverse_proxy whoami:80
}
EOF
Start everything:
docker compose up -dWithin a minute, Caddy will obtain TLS certificates and your services will be live at:
https://cloud.yourdomain.com, health check endpointhttps://status.cloud.yourdomain.com, Uptime Kuma (set this up to monitor your homelab services!)https://whoami.cloud.yourdomain.com, debugging / request inspector
Uptime Kuma is the killer app here. Point it at your homelab services and you’ll know within seconds when your home internet drops or a container dies. Free, self-hosted monitoring with notifications to Telegram, Discord, Slack, or email.
Step 4: Set up CloudWatch alarms
Use the free tier of CloudWatch to alert you if something goes wrong with the EC2 instance itself:
# CPU alarm — triggers if CPU > 80% for 10 minutes
aws cloudwatch put-metric-alarm \
  --alarm-name "homelab-cloud-high-cpu" \
  --metric-name CPUUtilization \
  --namespace AWS/EC2 \
  --statistic Average \
  --period 300 \
  --threshold 80 \
  --comparison-operator GreaterThanThreshold \
  --evaluation-periods 2 \
  --dimensions "Name=InstanceId,Value=$INSTANCE_ID" \
  --alarm-actions "arn:aws:automate:$REGION:ec2:recover" \
  --ok-actions "" \
  --treat-missing-data "breaching"

# Status check alarm — auto-recover if instance fails health checks
aws cloudwatch put-metric-alarm \
  --alarm-name "homelab-cloud-status-check" \
  --metric-name StatusCheckFailed \
  --namespace AWS/EC2 \
  --statistic Maximum \
  --period 60 \
  --threshold 1 \
  --comparison-operator GreaterThanOrEqualToThreshold \
  --evaluation-periods 3 \
  --dimensions "Name=InstanceId,Value=$INSTANCE_ID" \
  --alarm-actions "arn:aws:automate:$REGION:ec2:recover"
The ec2:recover action migrates your instance to new hardware if the underlying host has a problem. Free, automatic, and it preserves your data and Elastic IP.
Step 5: Instance backup to S3
Back up your Docker Compose configs and volumes nightly. This is lightweight. We’re not backing up the OS (you can rebuild that in minutes with the user data script), just the state:
# On the EC2 instance
cat > /usr/local/bin/backup-stack.sh << 'SCRIPT'
#!/bin/bash
set -euo pipefail

BACKUP_BUCKET="your-backup-bucket"
TIMESTAMP=$(date +%Y%m%d-%H%M%S)

# Stop services briefly for consistent backup
cd /opt/stack
docker compose stop

# Archive the stack directory and named volumes
tar czf /tmp/stack-backup-$TIMESTAMP.tar.gz \
  /opt/stack/ \
  /var/lib/docker/volumes/

# Restart services
docker compose start

# Upload to S3
aws s3 cp /tmp/stack-backup-$TIMESTAMP.tar.gz \
  "s3://$BACKUP_BUCKET/ec2-backups/$TIMESTAMP.tar.gz" \
  --storage-class STANDARD_IA

# Clean up local temp file
rm /tmp/stack-backup-$TIMESTAMP.tar.gz

# Keep only last 7 days of backups in S3 (handled by lifecycle policy)
echo "Backup complete: $TIMESTAMP"
SCRIPT

chmod +x /usr/local/bin/backup-stack.sh

# Run nightly at 3 AM
echo "0 3 * * * root /usr/local/bin/backup-stack.sh >> /var/log/backup.log 2>&1" \
  > /etc/cron.d/stack-backup
The brief service stop during backup is usually under 30 seconds. If you need zero-downtime backups, use Docker volume snapshot tools or run restic against the live volume directories (see the S3 + restic guide).
What to run on this stack
With 1GB of RAM (plus 1GB swap), you need to be selective. Here’s what fits comfortably:
Good fit (total ~600–800MB RAM):
- Caddy reverse proxy (~15MB)
- Uptime Kuma (~80MB): monitor your homelab from the outside
- A lightweight static site or API (~50MB)
- WireGuard endpoint (~5MB): public entry point tunneled to homelab
- Healthchecks.io alternative like Gatus (~30MB)
Too heavy for t3.micro:
- Grafana + Prometheus (need at least 2GB together)
- GitLab / Gitea (want 2–4GB)
- Anything with a JVM
- AI inference (obviously)
If you outgrow t3.micro, moving to t3.small (2GB RAM, ~€9.20/month) doubles your headroom. A t3.medium (4GB, ~€18.40/month) opens up Grafana and most self-hosted applications.
Hardening checklist
Before you call this production-ready, verify:
- SSH password authentication is disabled
- Root login is disabled
- fail2ban is running (
sudo systemctl status fail2ban) - Automatic security updates are enabled
- Security group only exposes ports 22, 80, 443
- SSH port 22 is restricted to your IP or accessed via Tailscale
- Swap is configured (
free -hshould show 1GB swap) - Backups are running and tested (
/usr/local/bin/backup-stack.sh) - CloudWatch alarms are active
The full picture
You now have a cloud presence that:
- Stays up when your home internet doesn’t: Uptime Kuma monitors your homelab and alerts you
- Gives you a public endpoint: HTTPS services with automatic certificates
- Backs itself up: nightly snapshots to S3
- Auto-recovers: CloudWatch will migrate the instance if hardware fails
- Costs under €10/month: and under €4/month in your first year
This is the foundation. From here you can add a WireGuard tunnel back to your homelab, run Ollama on GPU spot instances for heavy AI workloads, or use this as a stepping stone to Terraform-managed infrastructure.
The point isn’t to replace your homelab. It’s to complement it with the things cloud does best: public availability, offsite redundancy, and a stable IP that doesn’t change when your router reboots.
[discussion]
Comments are powered by Giscus — backed by GitHub Discussions. Sign in with GitHub to join the conversation.